Electrical advice
How to change a plug socket
26 Mar 2021 • 13 minutes
Electrical advice
26 Mar 2021 • 13 minutes
Before we get down to business, it’s important to remember that any electrical work should be carried out by a certified electrician who has the right level of competence to undertake the work safely.
First, you need to plan and prepare. What kind of replacement plug sockets do you want, and what kind of equipment will you need? What kind of safety precautions should you take? And maybe the first thing to tackle: how much is it going to cost to replace your plug socket? Let’s dive in.
If you’re thinking about getting a plug socket replaced, the cost can vary quite a bit depending on a few key things. Here's a simple breakdown of what can affect the price when you're hiring a professional electrician:
If you’re not ready to change the socket yourself, it might be worth getting a professional, qualified electrician in to help you out. And that’s easy with Ding.
The steps to fit the different types of sockets (including USB sockets) are as follows.
For each of the below tasks, follow these safety steps in turn and double-check you’ve done them before you carry out the work:
Always check the manufacturer’s instructions before you fit a new socket, as different makes and models could have different fitting requirements.
However, as a very basic general rule, while you’re mounting your new electrical socket, if your wall cable doesn’t reach the terminals of the new socket without straining, never ever pull it. In this case, contact a qualified electrician.

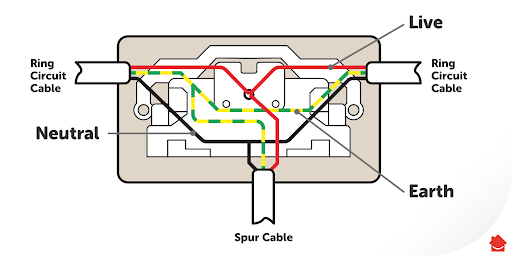
This is also the same colour coding that has been used for UK appliance cords for many years.
Before undertaking work, please review the safety first guidance at the top of this article.
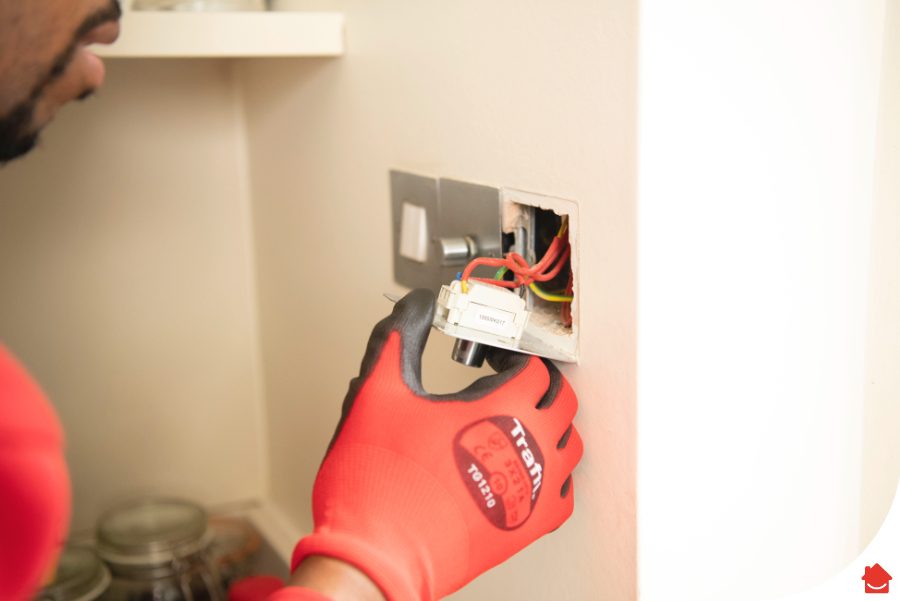
Once you have confirmed the circuit is dead, unscrew the socket faceplate and gently pull the faceplate forward. You’ll need enough slack in the wires behind to be able to completely flip the socket down so that the back surface is accessible. You should then loosen the screws at the terminals and free the wires.
Top tip: Make sure to take a picture of the wiring for reference, especially if you’ll be using the same model of socket.
If you don’t feel comfortable doing this, stop here, screw everything back properly and get a professional to do the job. If all is well, move on to the next step and keep the screws in case the new ones don’t fit.
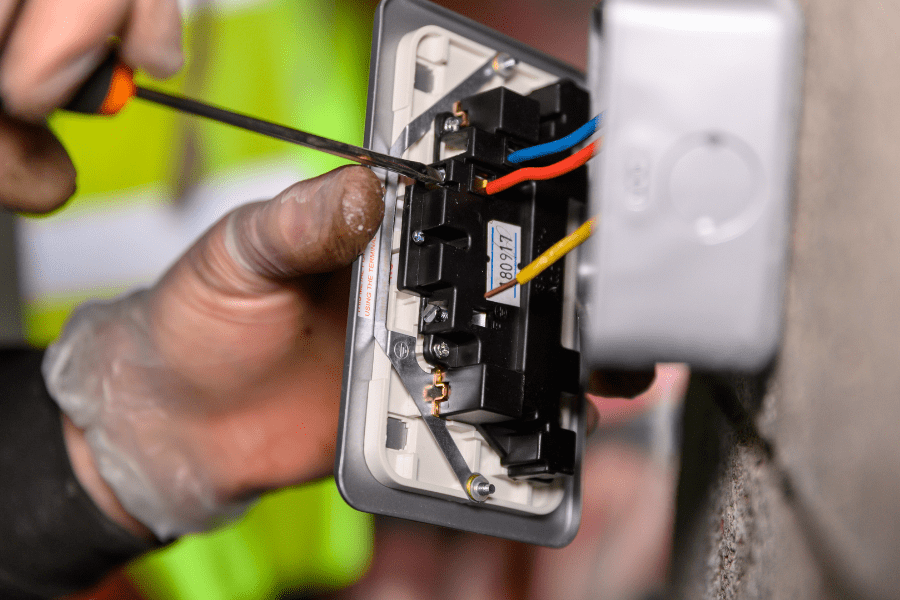
If any of the wires are damaged, and you have sufficient length, you should cut back the cores and strip the ends, leaving 5 mm of copper wire exposed. If the cable is too short, call an electrician. You’ll then need to cover the earth core wiring appropriately with an extra length of green and yellow wire sleeving if it’s exposed.
Keeping the terminal screws on the new socket open, identify the live (L), neutral (N), and earth (E) terminals on the socket and match them up to the corresponding wires.
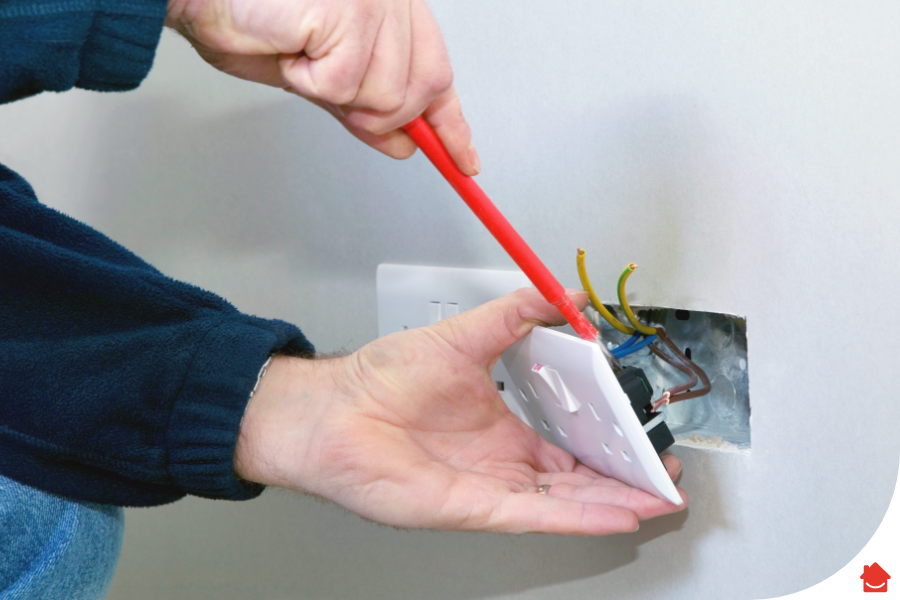
The metal back boxes must be earthed, so run a short length of earth cable between the earth terminals of the back box and the faceplate.
Once everything has been matched up properly, securely connect the wires to the appropriate terminals and fully tighten the terminal screws. Be careful not to tighten these too much, as you can shear through the copper wire.
Being careful not to trap any of the wires between the socket and the socket box, fit the new faceplate. If the new screws don’t fit the old box, re-use the original screws you kept to one side. Be careful not to over tighten your screws—you don’t want to crack your new socket’s casing.
Before switching the power back on at the fuse box, make sure all the connections are secure. Switch your power back on and make sure your socket is working correctly.
To replace a surface mounted socket with a flush mount a socket in a solid wall, you’ll need to cut a recess into the plaster and the masonry behind it.
Before undertaking work, please review the safety notice at the top of this article.
Once you have your tools ready to go, simply follow these steps:
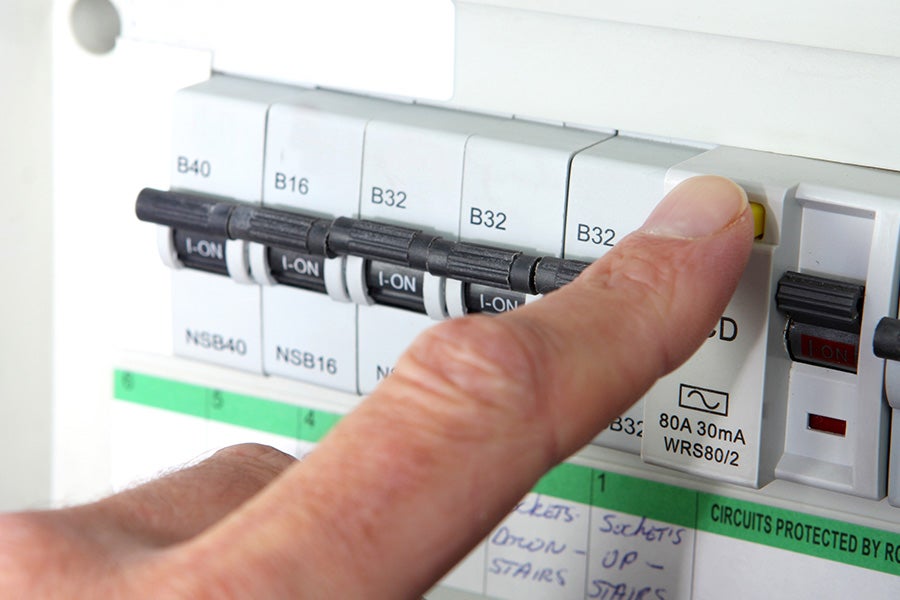
If the coast is clear, isolate the relevant circuit at your fuse box and ensure safe isolation to make sure the circuit is dead (triple-check this).
Now take your hammer action drill, fitted with a masonry drill bit and make a number of holes within the outline to a slightly greater depth than the depth of the mounting box. Some drills have a depth stop that you can set to the required depth. If you don’t have this, you can wrap some masking tape around the bit to show you where to stop.
Next, take your bolster and club hammer and start chipping out the plaster and masonry, cutting down to the depth of the holes you drilled.
Use your dustpan and brush to clear away all the plaster debris. Now check how the box fits.
While holding the box in place, mark the position with your pencil. Now drill the holes and put in the wall plugs. Screw the back box into the recess using your new holes.
Carefully remove the knock-out access holes and insert the proactive grommet, and then insert the cable through the access hole.
Take suitable and appropriate testing to ensure electrical safety.
The easiest way to flush-mount a socket into a stud wall is with a cavity fixing box. It sits against the face of the wall and has either rotating or spring-loaded lugs that press against the back of the plasterboard to help you position the socket more easily.
Before undertaking work, please review the safety notice at the top of this article.
Now that you have your tools, it’s time to get started.
If you don’t have a stud detector, tap the wall gently with a hammer handle and listen for the hollow sound to change when you tap over the framework.
Now, check the area is free of hidden pipes or cables with your pipe and cable detector.
If the coast is clear, isolate the relevant circuit at your fuse box and ensure safe isolation to make sure the circuit is dead (triple-check this).
Hold the cavity fixing box in the place you want it, using a spirit level to keep it level, then draw around the box in pencil.
Now get your screwdriver and push and twist it through the wall inside the pencil outline at diagonally opposite corners, to provide a guide for your pad saw or plasterboard saw blade.
If the box fits snugly in the hole, push it in, feeding the cable through the opening.
Take suitable and appropriate testing to ensure electrical safety.
And that’s it! You should now have the electrical socket you chose in place.
If you’re renovating your house and want a more refined look in your home, you’d be surprised how different your home looks when you’ve changed up the plug sockets. It’s a simple job to DIY because it uses an existing fitting, so it’s within the powers of a beginner DIYer, as long as you’re super safety-conscious.
A spur socket is an extra socket that has been added to an electric circuit. It usually has three cables – a ring main in, ring main out, and the spur going out.
No. If you’re just changing the style of your electrical socket or switching to a USB socket, it’s a simple enough task for a confident, beginner DIYer to do.
Before undertaking work, please review the safety notice at the top of this article.
It’s easy to replace an electric socket if you’re replacing like for like, e.g. simply changing the style of the sockets. If you need to move the socket, e.g. from surface mount to recess, then it’s a much more involved task and you will need to cut into the wall.
With Ding from HomeServe, you can get reliable repairs fast, whether it's a faulty socket, flickering lights, or something more serious.
Book your repair today and get your home back to safe and sound in no time.
Our help & advice articles cover Plumbing, Home heating, Electrical, Energy-saving and Home maintenance.