Boiler how-to
How to change a radiator valve
19 Apr 2024 • 10 minutes


Boiler how-to
19 Apr 2024 • 10 minutes
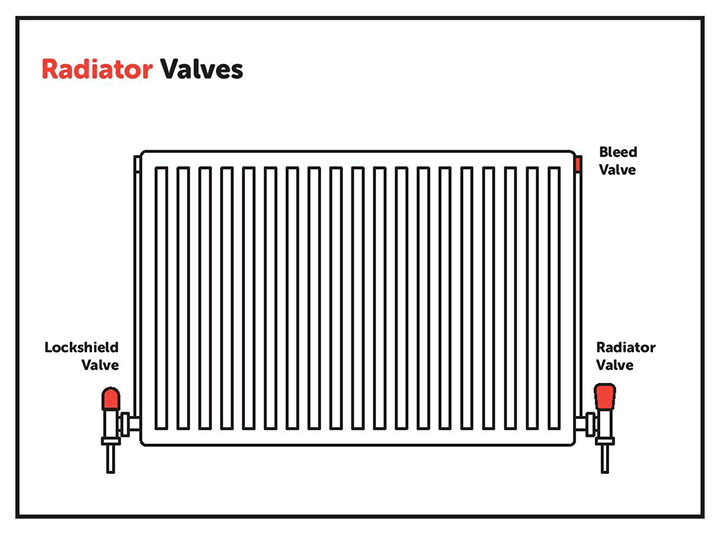
Radiator valves are used to control temperature, acting like taps to the water going into the radiator. Typically you’ll have two valves – one called a ‘control valve’ which is used to turn the radiator on and off by limiting the amount of water going into the radiator, and one called a ‘lockshield valve’ to balance your system by controlling the amount of heat the radiator gives off.
There are a few tell-tale signs that a radiator valve may need repairing or replacing:
If your radiator isn’t heating up efficiently or it has cold patches then you should first check if it needs bleeding. Head over to our handy how-to guide on bleeding radiators and follow the steps, then check your radiator again. If all is OK, then a radiator valve replacement is not necessary.
If you’ve followed the steps on how to bleed a radiator but it still hasn’t fixed the issue, and all your other radiators are working fine, it’s time to do some radiator valve repair.
How you troubleshoot this issue depends on which type of radiator valve you’ve got. There are three different types of radiator valves:
TRVs allow you more control over the temperature of your individual rooms, which means you can save energy in rooms you don’t use as much. Thermostatic Radiator Valves use an air temperature sensor to automatically regulate the flow of hot water into your radiator, so it stays at the temperature set on the dial. If it’s set to ‘*’ or ‘off’, the radiator won’t heat up but will allow enough warmth to ensure the pipes don’t freeze in Winter.
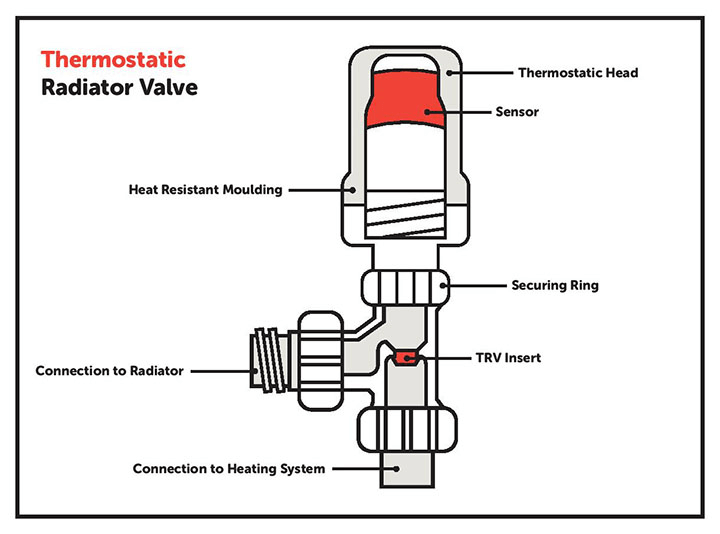
A TRV is made up of a ‘head’ piece and a ‘body’ piece. If the temperature drops lower or rises higher than your selected setting, a temperature-sensitive capsule inside the head of the TRV will either expand or contract, automatically pulling out or pushing in a pin in the body of the valve. This allows the valve to either open or close, either letting in more hot water to enter your radiator so it can heat up or reducing it so it cools down. Clever, huh?
The capsules in TRVs operate using a metal spring that is filled with wax or liquid. The liquid type is considered the most reliable at adjusting the temperature because the liquid is more responsive to fluctuations in temperature. Wax is generally slower, so less expensive.
This is the most commonly occurring problem with TRVs. The head of the valve starts sticking or catching, leaving the radiator jammed open or closed. This can happen if the valve hasn’t been adjusted in months – like at the end of a hot summer.
You can fix it by unscrewing the head of the TRV and taking a look at the pin – is it sticking up out of the body of the valve? If it’s stuck inside the valve or stiff, a spray of WD40 will probably fix it.
You can also try using a pair of long-nosed pliers to pull it out further. If it’s stuck right inside, try giving the valve a gentle tap around the outside edges, around the pin, with a hammer. If this doesn’t work and the pin is still stuck inside the body of the valve, try the seasoned plumber’s trick of gently tapping on the actual pin, and it should pop up, post-WD40.
If it’s not the pin that’s the problem, it could be that the wax or liquid capsule in the head of the TRV has failed and you’ll need to buy a new TRV valve head.
If the pin in the valve won’t budge with the hammer, you’re going to need to buy a completely new valve – and you’ll need to drain down your heating system.
You can seal a leaky TRV with some plumbers’ tape (plumbers call it PTFE tape).
First, isolate the radiator by turning both the TRV and the lockshield valve on the other side to ‘off’ or closed. The two compression nuts are strong suspects for the leak. The one on the radiator side can be easily slackened off and PTFE tape is applied to the olive – the compression fitting that looks like a bevelled ring.
If the thread on the insert is leaking, you can also slacken that off to expose as much thread as you need to. Wind the PTFE tape around the thread in the same direction as you would when loosening it. Then rewind it and tighten the nut and olive. Open the valves again to test for leaks.
With a manual radiator valve, the temperature is controlled globally by your thermostat. These types of valves are simpler to operate as there are fewer moving parts.
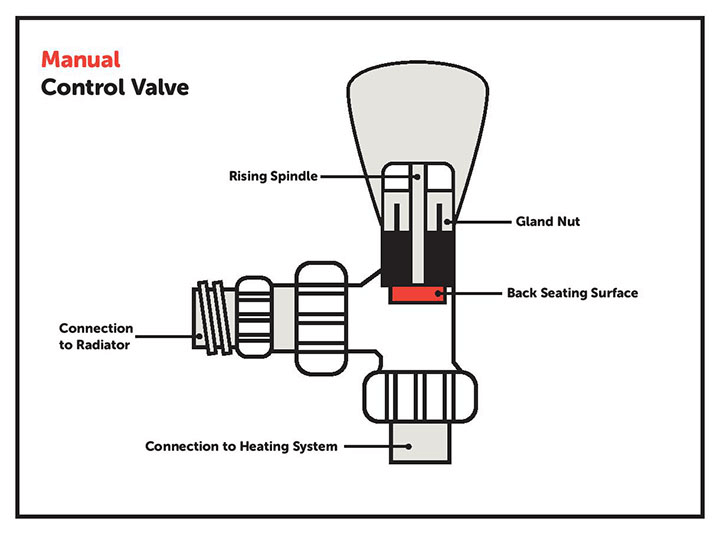
The most common problem you’ll encounter with manual valves is leaking glands. The gland is the point at which the spindle of the valve passes into the valve body (see diagram below).
The packing in the gland is designed to prevent water from leaking out around the spindle and is compressed around the spindle by the gland nut, which is the highest nut you can see on the spindle. Tightening this nut compresses the packing and may stop any leakage. However, if you tighten too far, the spindle becomes too stiff to turn.
Your manual valve may have a gland nut that is already tightened down hard and sealed internally by an ‘O’ ring. These valves show no visible thread on the gland nut itself. Once the ‘O’ ring wears, the valve will leak. If this type of valve leaks, setting the valve either fully closed or fully open may, temporarily, control the leaking but, the valve will need to be changed.
It may be possible to replace the ‘O’ ring itself but removing the gland nut completely is not for the fainthearted; on some valves, the spindle may come right out along with loads of dirty water, so towels at the ready.
Your lockshield valve is usually covered with a plastic cap – ‘lockshield’ means the plastic cap shields it from being accidentally adjusted or knocked.
If you remove the cap you’ll see the top of the spindle, which you can turn with a spanner to adjust the flow of water through the radiator. The spindle might be flat, square-shaped or even a half-moon shape.
You generally only need to adjust the lockshield valve when you’re ‘balancing’ your radiators in the various rooms in your house, i.e. adjusting each radiator so that it’s getting warm at the same speed as the others. E.g. if one radiator is taking too long to warm up, it needs more hot water flowing through it, so you should open your lockshield valve to allow the radiator to fill faster. If one radiator is getting hotter a lot quicker than the others, the flow may need restricting by tightening the lockshield valve.
This is a similar problem to the manual valve and you can use the same fix – get some PTFE tape and follow the above steps.
If your broken radiator valve can’t be redeemed by a repair, you must replace it. Here’s the list of tools you’ll need:
It’s very possible to change your radiator valve yourself without the risk of flooding if you follow a systematic process like the one in this guide. Carefully follow our 8-step process in the guide below.
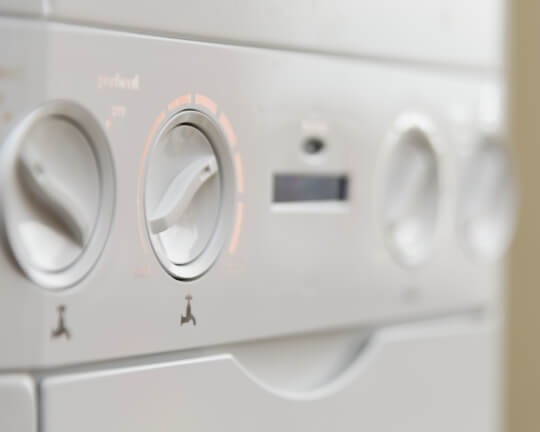
Before you start any work on your central heating system you’ll first need to drain it. If you have a combi boiler you can do this yourself by following the steps below, however, if you have a conventional heating tank system you’ll need to contact your local heating Home Expert for assistance.
How to drain your combi boiler heating system:
If you can’t drain your system (or decide not to), you can isolate your radiator instead:
Bleeding your radiators is a straightforward process that will release any trapped air thus allowing hot water to circulate easily,
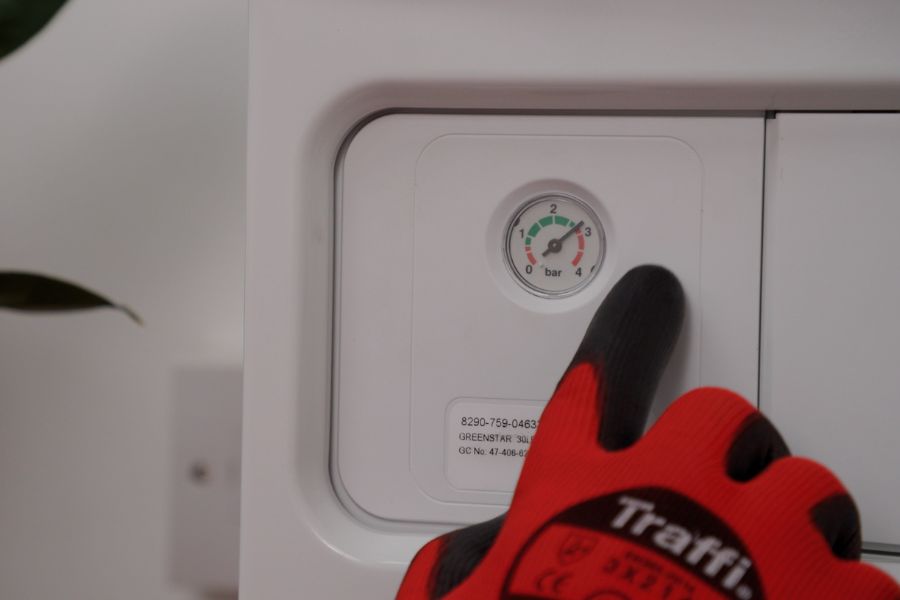
Once you’ve removed trapped air from the radiators, go back to the filling loop valve and turn it again, until the pressure gauge returns to 1.5.
It’s better to be safe than sorry! So here are a few of HomeServe’s top tips on dealing with radiator valves while keeping things calm and clean:
Still need help? One of our heating Home Experts will sort it.
Our help & advice articles cover Plumbing, Home heating, Electrical, Energy-saving and Home maintenance.